I do apologize for not having pictures for this tutorial, but if you have any questions please contact me and I will help you.
Step One:
Cut 2- 6x6 pieces of chipboard or thick cardstock
Cut 2- 6x8 pieces of chipboard or thick cardstock
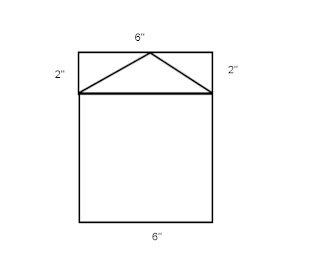
Draw a horizontal line two inches from the top of your 6X8. (You should end up with a square of 6x6. Next draw a ^ on top of your 6x6 square. The mid point should be at three inches.
Step Two:
Using your fabric, rotary cutter and ruler cut 8- 6.5x 6.5 squares. Also cut 4- 6.5x 2.5 rectangles for the front and back of the house. Now using a fabric marker mark on the wrong side of your fabric your square after you centered (this will give you a guide line when you sew your sleeve). For the square with the triangle on top do the same thing. Pin one of your 6.5x6.5 square to one of the rectangles right sides together. Then sew only the top horizontal edges that you pinned. Next pin two squares right sides together, pin two square with the sewn triangle-right sides together etc. You should now have two sets of squares and two sets of the square with the sewn triangled pinned right sides together.
Step Three:
Sew all your sleeves, leave the bottom part open. Trim as much as you can off the edges and tips. Iron all pieces. Insert your chipboard pieces and sew the bottoms shut. To make this look more professional making a running stich on all four sides of each pannel. Punch out three circles in each pannel.
Step Four:
Paint all your chipboards, resins, wood pieces everything you want to use for this mini. Also, print the picture you are using on printing fabric. Set them aside.
Step Five:
Make a window by punching out 4 squares then glue a piece of lace and adhere it to the pannel. Make a planter by cutting a 1/2 x 2 an inch strip of wooden paper. Then add two small pieces of the same paper for the sides. Using your hot glue fill up most of the planter with hot glue, then add moss and tiny flowers. Adhere with a glue gun. Using a punch make a border and adhere. Then glimmer mist a lace applique and adhere after it's dry. Cut a Welcome sign with your Cricut, then glam it up with some Martha Stewart Glitter. Adhere. Add some Melissa Frances pearls for dimension.
Step Six:
Free draw a door (you can do it), adhere lace around it. Apply chipboard heart and cut out girl from Melissa Frances paper, or print one out from your computer. Create and adhere a paper border, apply a piece of lace. Cut out another image or use a sticker for the wreath. Glue it to the top of your roof. Adhere pear strand and a single pearl as a knob.
Step Seven:
Cut and apply a piece of lace to the top, then add your picture. Cut some flowers from the Madeline K& Co paper. Adhere the flowers and the chipboard, then add a small piece of lace on the left side of your photograph. Glue on the large scroll chipboard, then add a paper small flower and pearls from Melissa Frances. The chipboard scroll and dress form are from The Dusty Attic.
Step Eight:
Cut a small Doilie in half, then place behind a picture. Add a scroll shape after you glitter it. Also, apply some lace under the photo and add some Prima Marketing flowers and a Tim Holtz ticket. Make a bow out of vintage seam binding adhere to a Dusty Attic Vintage Key and apply to the top of your photo.
Step Nine:
Cut and glitter a scroll shape. Apply it to the other half of the doillie, then add some pearls to the scroll and a small paper flower. Adhere then adhere the picture. Apply some lace and a cut out image . Add some painted Tim Holtz scrolls a bow made with pearl strand. Embelish a Prima Flower with coarse glitter and glass shavings. Adhere.
Step Ten:
Cut one of your pictures in a circle and adhere. Cut flowers from Madelline paper and surround the picture. Add lace around the picture and around the top of the triangle. Adhere your scroll on the top, I used Dusty Attic scroll (love them!) . Also, add a small paper rose to the center of your scroll.
Step Eleven:
Cut some ribbon pieces and thread them thru the holes. Tie them together and that's it, easy!
I really hope you can understand this tutorial and create a beautiful house. Thank you for your wonderful comments; they really do mean a lot!


2 comments:
Oh, this house is sooo gorgeous, Leslie!!
Es precioso el mini álbum. He mirado el tutorial para intentar hacer alguno parecido.
Un saludo
Post a Comment